Hello all~
I apologise for not posting in a long time, i've been wrapped up in things and i've been ill, so if I look a bit tired and things in this blog post, that'll be why.
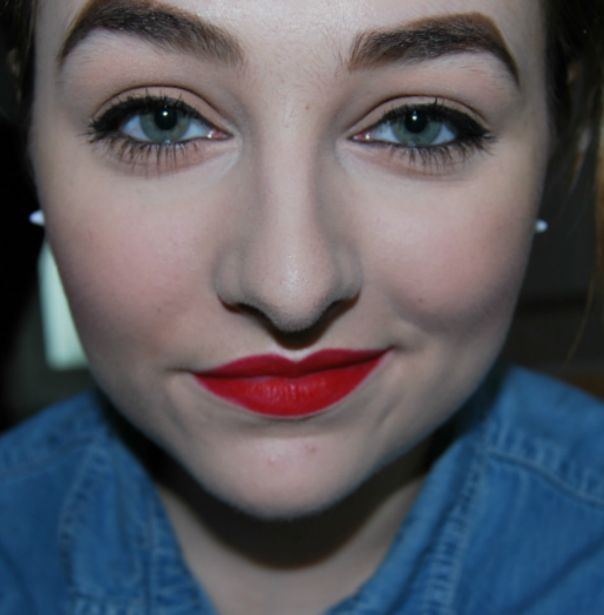
This blog post is about Rita Ora~! Rita Ora, for those who may not know, is a singer in the UK whose signature makeup look is her red lips. She mainly wears red, but she has been seen with a baby pink lipstick and a dark plum colour.
If you would like to know how to achieve this look:
Please keep on reading~
Apply a toner, moisturiser, primer, foundation/BB Cream and concealer to your face
Rita's brows are thin, but rather arched, and I have large bushy brows so I had to work with what i've got. If I had glue, I would have erased them and drawn them back on, but anyway, I started using a dark eyebrow pencil and in short strokes, began drawing in an arch. I did the same on the other brow and filled them in. Everyone's eyebrows are different, you can skip this step and fill yours in the way you usually do, or what not, it's entirely up to you~
They look scouse brow-ish here...
Apply a primer to your eyelids to prevent your eye shadows from creasing, then take a warm light brown and pat this over your eyelids. I say pat because if you sweep the colour, you'll have a much higher chance of getting fall out under your eyes and the colour will appear stronger when you pat it on your lids.
Take a light ash brown colour and sweep this into your crease. Rita's eye makeup is very minimal, and she rarely uses shimmery eye shadows.
Apply a powder in the T zone of your face, your forehead, nose and chin. Then apply a lip balm to prep your lips for lipstick later.
Use an eyeliner of your choice and line your eyes. You want to make sure the liner is thin on top with a small wing. Rita doesn't exaggerate her eyeliner like a lot of celebrities or other people would, why I don't know. You want to tight line and line your water line with a black eye pencil too. After that, you want to load your lashes with a lot of mascara, or you can opt for false eyelashes.
Apply a bronzer/contour colour of your choice and apply this under your cheek bones. This will slim out the face and if you don't know where your cheek bones are, suck in your cheeks so you're doing the fish face --> '3' <-- a fish face! Apply a highlighter to the tops of your cheeks and cupids bow.
Now it's time for the red lips~! Of course, if you don't like red lipstick, you can opt for a different colour of your choice.
Line your lips and fill them in with a red lip liner and then use a bright red lipstick over the top of the liner.
And you're all done! The Rita Ora look is complete~ just style your hair and accessorize, and you're good to go!
I hope you enjoyed this Rita Ora makeup look!
Have fun with this makeup look, make changes here and there if you want to, just as long as you're happy with the outcome!
Thank you again for reading and stay tuned because soon I will be doing 3 Final Fantasy makeup looks~!
Wednesday, 15 August 2012
Wednesday, 1 August 2012
IU "Real" inspired makeup tutorial
I've had my first request~! Oh happy days! The look that was requested was IU's makeup for her album"Real", it's pretty much a brown smokey eye, but in her look she wore very long and thin eyelashes, but I wanted to make this a much more wearable look, so there are no falsies in this~ but, of course, if you wanted to add lashes, you can!
With that being said, if you would like to know how to create this look:
Then please keep on reading~
First, I applied a toner, moisturiser and primer to my face, after that I applied BB Cream to my face.
For this look, I decided to straighten out my brows since IU's are pretty straight. I used a eyebrow pencil for this and slowly drew under the arch of my brow. Once I was happy with the shape, I filled in my brows and added brow mascara.
I then applied a primer to my lids to stop my eye shadows from creasing. Once that was done I put a light/medium matte brown (1) all over my lids. Don't worry if it's messy, you'll be blending it out.
Then I used a reddish bronze shimmery eye shadow on the inner and outer corners of my eyes and blended them in. Make sure they don't blend too far into the lid, you still want the centre of your lid to have the light/medium brown appear through.
I then took a dark reddish brown (3) and applied this on the outer corner of my eyes and blended. Make sure to bring the eye shadow down and slightly past your eyes. Use a matte white/cream eye shadow as a brow highlight (4).
I used a shimmery dusty gold shade (6) and applied this on the centre of my lids. This will make your eyes appear larger and highlight them.
Using the same matte light/medium brown, I applied this on my lower lash line, bringing it quite far in. Then I used a matte brown that was 1-2 shades darker (5) on the centre of my lower lash line, and then I went back into the reddish bronze and applied this on the outer corners of my lower lash line.
I used the same dark reddish brown eye shadow on my lash line to smoke it out a bit and I applied an inner corner highlight on my lower lash line.
I applied concealer where I needed it and set my makeup into place with powder. I then used a lip balm to prep my lips for lip stick.
I lined my eyes with a pen liner, then I used a black pencil liner and only lined the inner corners of my eyes. After that I applied mascara.
I used an orange shade of blush and applied it a bit heavily on my cheeks. I made sure to blend this out well!
I wanted to mute out my natural lip colour, so I used a small amount of concealer on my lips. Once that was done I took a dark nude lip gloss and applied this all over my lips. I then took a very light pink lip gloss and layered this over the first lip gloss to get a perfect nude lip.
And that's it!
Style your hair accordingly if you want to and that completes the IU inspired makeup!
Thank you so much for reading~!
I hope you enjoyed this makeup look~
With that being said, if you would like to know how to create this look:
Then please keep on reading~
First, I applied a toner, moisturiser and primer to my face, after that I applied BB Cream to my face.
For this look, I decided to straighten out my brows since IU's are pretty straight. I used a eyebrow pencil for this and slowly drew under the arch of my brow. Once I was happy with the shape, I filled in my brows and added brow mascara.
I then applied a primer to my lids to stop my eye shadows from creasing. Once that was done I put a light/medium matte brown (1) all over my lids. Don't worry if it's messy, you'll be blending it out.
Then I used a reddish bronze shimmery eye shadow on the inner and outer corners of my eyes and blended them in. Make sure they don't blend too far into the lid, you still want the centre of your lid to have the light/medium brown appear through.
I then took a dark reddish brown (3) and applied this on the outer corner of my eyes and blended. Make sure to bring the eye shadow down and slightly past your eyes. Use a matte white/cream eye shadow as a brow highlight (4).
I used a shimmery dusty gold shade (6) and applied this on the centre of my lids. This will make your eyes appear larger and highlight them.
Using the same matte light/medium brown, I applied this on my lower lash line, bringing it quite far in. Then I used a matte brown that was 1-2 shades darker (5) on the centre of my lower lash line, and then I went back into the reddish bronze and applied this on the outer corners of my lower lash line.
I used the same dark reddish brown eye shadow on my lash line to smoke it out a bit and I applied an inner corner highlight on my lower lash line.
I applied concealer where I needed it and set my makeup into place with powder. I then used a lip balm to prep my lips for lip stick.
I lined my eyes with a pen liner, then I used a black pencil liner and only lined the inner corners of my eyes. After that I applied mascara.
I used an orange shade of blush and applied it a bit heavily on my cheeks. I made sure to blend this out well!
I wanted to mute out my natural lip colour, so I used a small amount of concealer on my lips. Once that was done I took a dark nude lip gloss and applied this all over my lips. I then took a very light pink lip gloss and layered this over the first lip gloss to get a perfect nude lip.
And that's it!
Style your hair accordingly if you want to and that completes the IU inspired makeup!
![]() |
| Flash |
![]() |
| Natural light |
Thank you so much for reading~!
I hope you enjoyed this makeup look~
Subscribe to:
Posts (Atom)